![]()
![]()
services
statistics
projects
policies
software
support
resources
staff

|
Over
Quota on the UTORmail System: Q. I'm confused! I am using Outlook Express and I only have a few messages in my INBOX yet the UTORmail system is telling me that I am over the 20MB quota. How can this be? A. There are a few possibilities.
BATTLING INVISIBLE MESSAGE BUILDUP Determining whether or not "invisible message buildup" is the problem and how to fix it. Outlook Express 5.0 - Windows 95/98
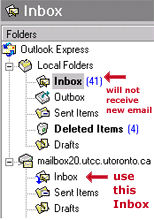
1. Choose Accounts... from the Tools menu. An Internet Accounts dialog will appear. Click the Mail tab. Locate and select the entry for mailboxX.utcc.utoronto.ca. Click the Properties button. When the Properties dialog appears, click the Servers tab. Take note of you Incoming mail (POP3) and Outgoing mail (SMTP) servers - you will need this information in step 3. Click Cancel. 2. Make sure the the entry for mailboxX.utcc.utoronto.ca is still selected. Click the Remove button. 3. Click the Add button and choose Mail... An Internet Connection Wizard will appear. Fill in the information as required and click the Next button to proceed. 4. When you arrive at the E-mail Server Names, you will see "My incoming server is a POP3 server" - use the pop-up menu to change POP3 to IMAP. Fill in the Incoming mail and Outgoing mail fields with the information you jotted down in step 1. Click Next. 5. In the Account Name field for Internet Mail Logon, type in your UTORid. (If you do not know what your UTORid is, please go to UTORid Management and click on "get information".) Type your UTORmail password in the Password field. Click Next. 6. The final Congratulations window will appear. Click Finish.
1. Under Windows95/98, click on 'Start' ->, go to 'Run' and type in: telnet log.agent.utoronto.ca and then press enter. 2. For the login, please enter your 8 digit library number. For the password, please enter your 9 digit student/personnel number. 3. You will then see a menu of 5 options. Press '1' on your keyboard (but do NOT press the enter key as it automatically does this for you) and then wait until it changes to the Pine screen, where you would then enter your UTORmail email password. 4. Once it accepts your password, press enter twice and you will then see your message list. Use the up and down arrow keys to navigate (use the '-' key to go up one page and the '+' key to navigate down one page at at a time) and press the 'd' key to mark messages for deletion, and use the 'u' to undelete messages accidentally marked for deletion. 5. Once you have marked a message for deletion, a 'D' shows up to the left of each message. Press 'q' to quit the program, and then press 'y' twice to confirm quitting, and then to confirm the removal of messages marked with the 'D' to the left of them. 6. Open Outlook Express and deselect the "Leave a copy of messages on server" option. Review the instructions for getting to the option as above. Deleting a message is actually a two step process.
If the process is not completed, messages marked for deletion will build up and push you over quota. To expunge deleted messages in Outllook Express, choose Purge Deleted Messages from the Edit menu. So it wasn't invisible message buildup in your INBOX and it wasn't that messages marked for deletion hadn't been purged. The remaining possibility is that one or more of your remote folders (i.e. folders kept at the UTORmail postoffice) has grown and the cumulative total of your INBOX AND remote folder(s) exceeds the 20MB quota. Please check any remote folders. You may move messages to folders under Local Mail or delete and expunge messages you are no longer interested in.
|

